
By Derek Burk
As you may have learned in our recent blog post, the IPUMS Extract API now supports microdata, starting with the IPUMS USA and IPUMS CPS collections. That means registered users can create and download microdata extracts without clicking through the IPUMS website. The ipumsr R package can help you interact with the API using R code.
TL;DR
I’ll get into more detail below, but if you want a quick overview of what you can do with the API and ipumsr, here’s how you would create an extract, wait for it to process, download it, and read it into R in just a few lines of code1:
library(ipumsr)

my_extract_definition <- define_extract_cps(
  "My extract",
  samples = "cps2019_03s",
  variables = c("AGE", "SEX", "RELATE")
)

data <- my_extract_definition |>
  submit_extract() |>
  wait_for_extract() |>
  download_extract() |>
  read_ipums_micro()
#> Successfully submitted IPUMS CPS extract number 74
#> Waiting 10 seconds...
#> Checking extract status...
#> Waiting 20 seconds...
#> Checking extract status...
#> Extract ready to download
#> DDI codebook file saved to C:/Users/derek/Documents/ipumsr-intro-api-blog-post/cps_00074.xml
#> Data file saved to C:/Users/derek/Documents/ipumsr-intro-api-blog-post/cps_00074.dat.gz
#> Use of data from IPUMS CPS is subject to conditions including that users should
#> cite the data appropriately. Use command `ipums_conditions()` for more details.

data
#> # A tibble: 180,101 × 12
#>     YEAR SERIAL     MONTH   CPSID  ASECFLAG ASECWTH PERNUM
#>    <dbl>  <dbl> <int+lbl>   <dbl> <int+lbl>   <dbl>  <dbl>
#>  1  2019      4 3 [March] 2.02e13  1 [ASEC]   2032.      1
#>  2  2019      6 3 [March] 2.02e13  1 [ASEC]   1232.      1
#>  3  2019      7 3 [March] 2.02e13  1 [ASEC]   1209.      1
#>  4  2019      8 3 [March] 2.02e13  1 [ASEC]   1146.      1
#>  5  2019      8 3 [March] 2.02e13  1 [ASEC]   1146.      2
#>  6  2019     13 3 [March] 2.02e13  1 [ASEC]   1588.      1
#>  7  2019     15 3 [March] 2.02e13  1 [ASEC]   1583.      1
#>  8  2019     18 3 [March] 2.02e13  1 [ASEC]    981.      1
#>  9  2019     18 3 [March] 2.02e13  1 [ASEC]    981.      2
#> 10  2019     20 3 [March] 2.02e13  1 [ASEC]   1539.      1
#> # … with 180,091 more rows, and 5 more variables:
#> #   CPSIDP <dbl>, ASECWT <dbl>, RELATE <int+lbl>,
#> # AGE <int+lbl>, SEX <int+lbl>
The next section describes how to get access to the API. Then, I’ll unpack some of the functions in the above code chunk, and conclude by showing how you can revise and resubmit an existing extract via the API. In these examples I use IPUMS CPS, but the process works the same way for IPUMS USA extracts.
Getting access to the API
Only registered IPUMS users can access the API, and since IPUMS USA and IPUMS CPS are currently the only supported microdata collections, you’ll need to be registered with one of those collections to create and download extracts via API. Here’s where you can register for IPUMS USA, or register for IPUMS CPS.
As of this writing, microdata support for the IPUMS Extract API is still in beta. To request access to the API during this beta period, send an email to ipums+api@umn.edu with the subject line “Join API Beta Program”. The beta status also means that some functionality may change based on tester feedback.
Once you’ve been granted beta access, you’ll need to create an API key.
Once you’ve created an API key, install the latest version of ipumsr from CRAN with:
install.packages("ipumsr")
And load the package with:
library(ipumsr)
Next, set your API key for the duration of your R session with:
set_ipums_api_key("paste-your-key-here")
To set your API key and save it for use in future sessions, use the same function, but with save set to TRUE:
set_ipums_api_key("paste-your-key-here", save = TRUE)
This will add your API key to a file named “.Renviron” in your user home directory, so that the value of the IPUMS_API_KEY environment variable is defined every time R starts up.
The define, submit, wait, and download workflow
Now let’s unpack the code chunk from above. Here it is again:
my_extract_definition <- define_extract_cps(
  "My extract",
  samples = "cps2019_03s",
  variables = c("AGE", "SEX", "RELATE")
)

data <- my_extract_definition |>
  submit_extract() |>
  wait_for_extract() |>
  download_extract() |>
  read_ipums_micro()
So how did I get from zero to loaded IPUMS data in just a few lines of code?
The first expression uses define_extract_cps() to create an object called my_extract_definition which contains the definition of a yet-to-be-submitted extract. If I print that object, I see:
my_extract_definition
#> Unsubmitted IPUMS CPS extract
#> Description: My extract
#> Samples: (1 total) cps2019_03s
#> Variables: (3 total) AGE, SEX, RELATE
Notice that the samples argument to define_extract_cps() takes special sample codes which you wouldn’t normally see when creating an extract with the online extract system. You can browse the sample codes for IPUMS USA here and the sample codes for IPUMS CPS here.
At this point, the my_extract_definition object is a bit like your Data Cart on cps.ipums.org once you’ve added some samples and variables – it has all the information needed to submit an extract request, but it has not yet been submitted for processing.
To submit your extract request, use the submit_extract() function. This function sends your request to the IPUMS extract engine for processing, and returns an object containing the extract definition plus the processing status and ID number of the extract request:
submitted_extract <- submit_extract(my_extract_definition)
#> Successfully submitted IPUMS CPS extract number 74
submitted_extract
#> Submitted IPUMS CPS extract number 74
#> Description: My extract
#> Samples: (1 total) cps2019_03s
#> Variables: (12 total) YEAR, SERIAL, MONTH, CPSID, ASECFLA...
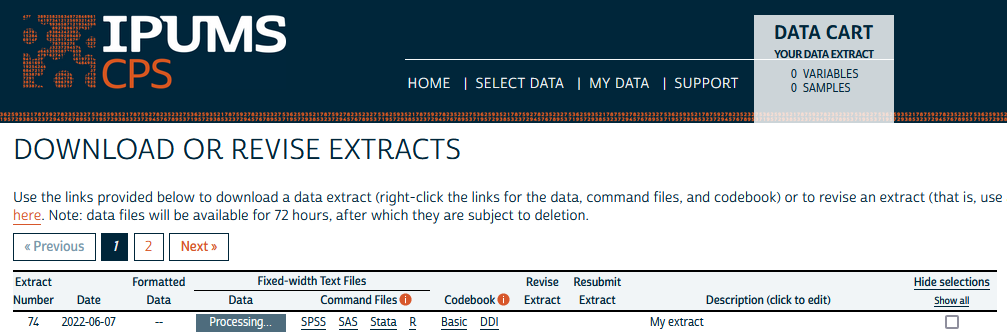
As you can see, the extract engine has assigned an extract number to your request and has added the same preselected variables that are added to CPS extracts created on the web. Rather than an unsubmitted Data Cart, the submitted_extract object returned by submit_extract() can be thought of as a line on your “My Data” page on the website – and in fact, it appears as a line on that page the same way it would if you submitted via the web:
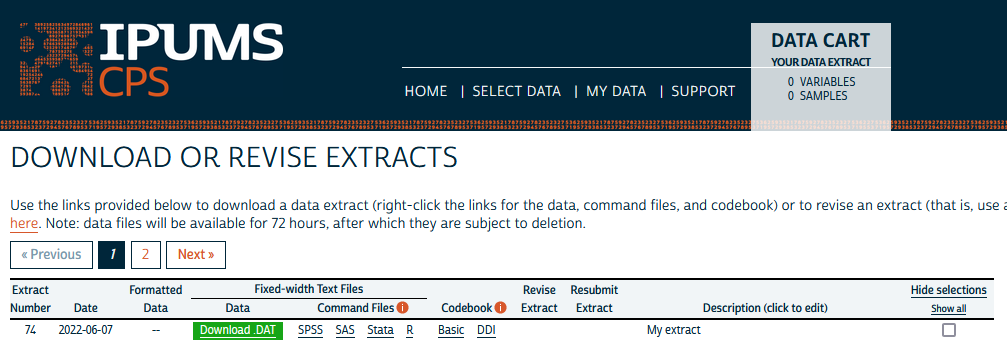
Now you’re in that agonizing period between when you submit your extract and the moment you load your data into R. You could spend that time refreshing your “My Data” page until the extract is ready, but why not have R do the checking for you? That’s what wait_for_extract() is for. It checks the status of your extract every so often (by default, after 10 seconds, then 20 more seconds, then 40 more seconds, etc.). When the extract is ready to download, wait_for_extract() returns an object with all the information that was in submitted_extract plus the URLs for downloading your data and codebook files. In other words, the object returned by wait_for_extract() is analogous to that same line from the screenshot above, but with the gray “Processing…” box transformed into a green “Download .DAT” button:
At this point, you could just download the data and codebook by pointing and clicking on the “My Data” page, even if you created the extract via the API. Using the download_extract() function, however, offers some nice conveniences. Firstly, download_extract() downloads both the data file and DDI codebook in one fell swoop, and it downloads them into your working directory (by default), which is especially convenient if you’re following a project-oriented workflow. Secondly, download_extract() returns the file path at which it saves the DDI codebook, which you can pass to read_ipums_micro() to read in your extract data:
path_to_ddi_file <- download_extract("cps:74")
#> DDI codebook file saved to C:/Users/derek/Documents/ipumsr-intro-api-blog-post/cps_00074.xml
#> Data file saved to C:/Users/derek/Documents/ipumsr-intro-api-blog-post/cps_00074.dat.gz
read_ipums_micro(path_to_ddi_file)
#> Use of data from IPUMS CPS is subject to conditions including that users should
#> cite the data appropriately. Use command `ipums_conditions()` for more details.
#> # A tibble: 180,101 × 12
#>     YEAR SERIAL     MONTH   CPSID  ASECFLAG ASECWTH PERNUM
#>    <dbl>  <dbl> <int+lbl>   <dbl> <int+lbl>   <dbl>  <dbl>
#>  1  2019      4 3 [March] 2.02e13  1 [ASEC]   2032.      1
#>  2  2019      6 3 [March] 2.02e13  1 [ASEC]   1232.      1
#>  3  2019      7 3 [March] 2.02e13  1 [ASEC]   1209.      1
#>  4  2019      8 3 [March] 2.02e13  1 [ASEC]   1146.      1
#>  5  2019      8 3 [March] 2.02e13  1 [ASEC]   1146.      2
#>  6  2019     13 3 [March] 2.02e13  1 [ASEC]   1588.      1
#>  7  2019     15 3 [March] 2.02e13  1 [ASEC]   1583.      1
#>  8  2019     18 3 [March] 2.02e13  1 [ASEC]    981.      1
#>  9  2019     18 3 [March] 2.02e13  1 [ASEC]    981.      2
#> 10  2019     20 3 [March] 2.02e13  1 [ASEC]   1539.      1
#> # … with 180,091 more rows, and 5 more variables:
#> #   CPSIDP <dbl>, ASECWT <dbl>, RELATE <int+lbl>,
#> #   AGE <int+lbl>, SEX <int+lbl>
Hopefully it’s a bit easier now to make sense of the define, submit, wait, and download code chunk from the beginning of this post. But now you may be wondering what’s going on with the “cps:74” notation in that last chunk. If so, read on for another helpful workflow enabled by the API.
The revise and resubmit workflow
Even if you’re interested in using the API, you may very well continue to make extracts via the web interface, which is better suited for data discovery – to create an extract from scratch via API, you already need to know the sample codes and variable names you want. Often, however, you may start analyzing your IPUMS data and realize you want to add some samples or variables to the extract you created on the web. If you find yourself in that situation, the API and ipumsr are here to help.
If you want to add samples or variables to an existing extract, take note of the extract number on the “My Data” page. To add a sample and a variable to CPS extract number 74, for example, you would use:
revised_extract_definition <- get_extract_info("cps:74") |>
  add_to_extract(samples = "cps2018_03s", variables = "EDUC")

revised_extract_definition
#> Unsubmitted IPUMS CPS extract
#> Description: My extract
#> Samples: (2 total) cps2019_03s, cps2018_03s
#> Variables: (13 total) YEAR, SERIAL, MONTH, CPSID, ASECFLA...
Then, you can submit, wait for, and download revised_extract_definition in the same way described above.
Learning more
For more on using ipumsr with the IPUMS API, check out the ipumsr API vignette here, and stay tuned for upcoming blog posts on extract sharing with R and Python, and how to interact with the API using Stata.
1In case you haven’t seen it, |> is the base R equivalent (available as of R version 4.1.0) of the tidyverse %>% operator. For more details see this R-bloggers post.